
Our website is supported by our readers. We sometimes earn a commission when you click through the affiliate links on our website at no extra cost to you.
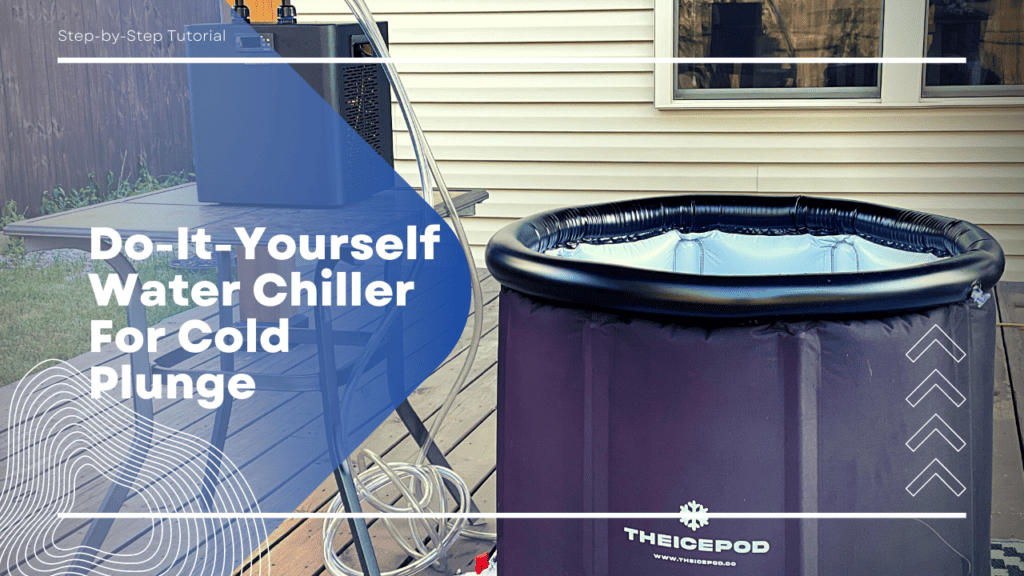
Whether it’s aiding muscle recovery, boosting circulation, or promoting mental clarity, the allure of a cold plunge is undeniable. However, one common hurdle to enjoying this exhilarating experience is the need for a hefty amount of ice to chill the water. We feel your pain. Constantly adding ice is tedious and very expensive! In this post, we will tell you about an exciting solution—a DIY water chiller for your Ice Pod portable cold plunge that will save you thousands of dollars.
This step-by-step tutorial will allow you to indulge in a revitalizing cold plunge without the hassle and cost of adding ice.
What Is A Water Chiller and Why Is It Better Than Adding Ice?
Before we get into the nitty-gritty, let us explain what a water chiller is and why you want one in the first place.
A water chiller for ice baths is a specialized self-contained refrigerator that cools the water used in cold plunges without the need for ice. This nifty device can maintain a constant temperature all the way down to 39°F (4°C).
Once set up, it requires very little maintenance. And best of all? You can say goodbye to the repetitive task of running to the store for a bag of ice every day or two. Because unless you have a standalone ice maker, that’s exactly what you’ll need to do.

How To Save Money On A Cold Plunge Water Chiller
So what’s the drawback to adding a water chiller? Traditional chillers can be a bit pricey. Even the cheapest add-on water chillers from Ice Pod, for example, will set you back at least $1000. Most others can cost upwards of $2-5K. Yikes!
However, we’ll let you in on a little secret. Did you know, that saving big bucks simply comes down to semantics? Let us explain.
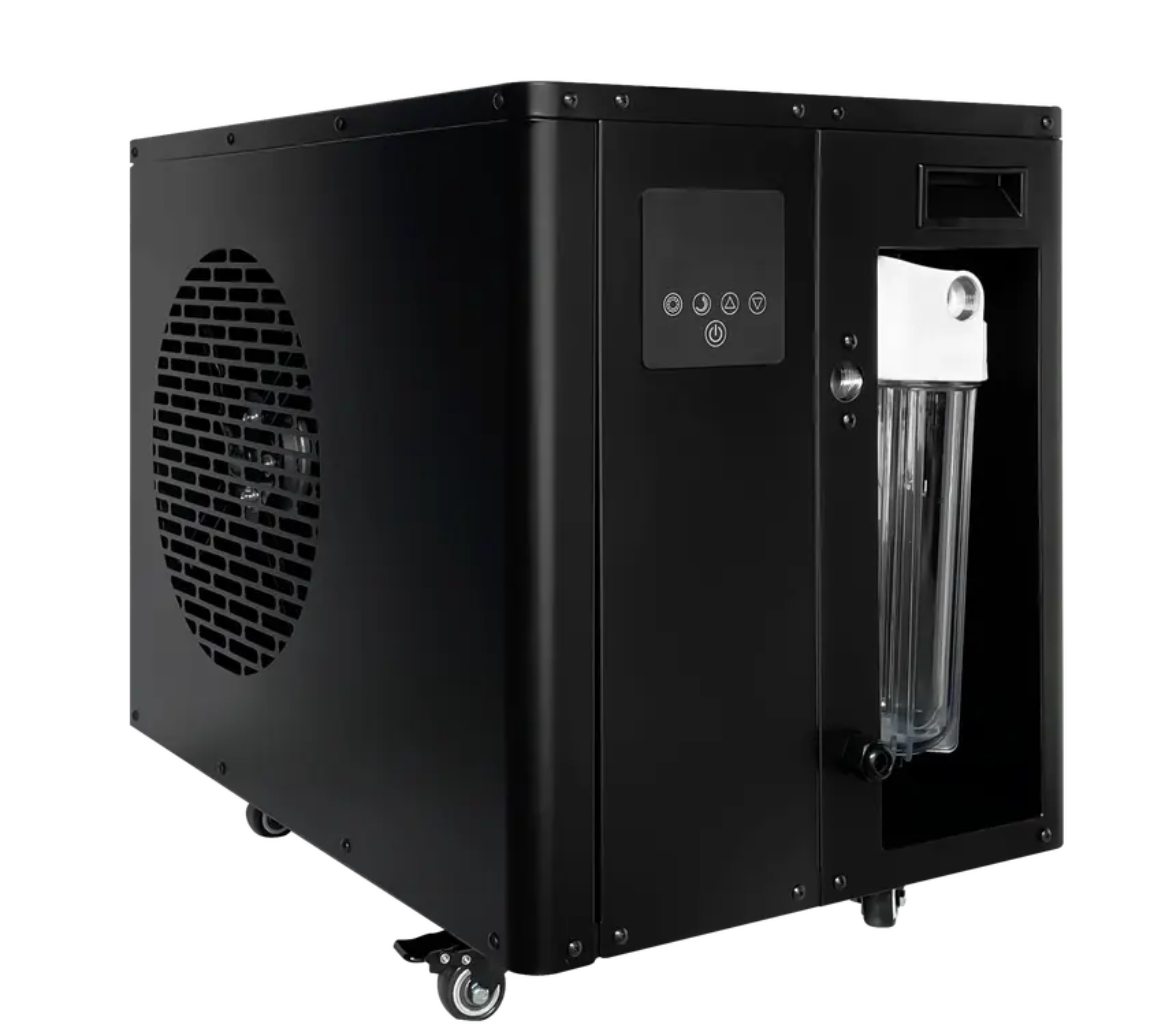
Take a look at the side-by-side photo below. On the left is an image of the Water Chiller from the Pod Company that retails for $1500. On the right is a nearly identical water chiller selling on Amazon for $400. Why the difference you ask? One is being marketed as a water chiller for “Cold Plunge” and the other as an “Aquarium Chiller” or “Hydroponic Water Chiller“.

Yep, those two chillers likely rolled off the same assembly line.
1/3HP Chiller vs. 1/10HP Water Chillers For Cold Plunge
For this project, we use a 1/3 HP Aquarium Chiller from Amazon. Alternatively, you can purchase this one from eBay. With a recommended refrigeration volume of 79 gallons, these 1/3HP water chillers work great for a portable cold plunge.
1/10 HP Chillers
If you’re shopping around on Amazon, you might notice that the 1/10HP water chillers are more widely available. Do they work too? Yes and No.
Technically too small for our application, we tested the Poafamx 1/10HP model anyway to see how well it would do. After 2 days running, it achieved a still quite frigid 54 degrees Fahrenheit under a covered patio with a mid-80-degree daytime ambient temperature. For muscle recovery, that’s considered the perfect temperature.
Should You Even Consider a 1/10HP Water Chiller? Bottom Line

Only buy a 1/10HP chiller if you fully understand that it is underpowered and will need to work harder to keep things cool. It could work well for you in the short-term, but long-term we would suggest something with more cooling capacity. Don’t even consider a 1/10HP chiller if:
- If you live in a hot climate and intend to use it outside
- You want to cool more than 70 gallons of water
- You want sub 50-degree water (particularly during the summer)
What About More Powerful Water Chillers–Are They Worth It?
If you’re looking for an all-in-one water chiller with a minimal amount of extra parts needed, consider the Spartan 1/2HP WIFI Chiller + Heater. It’s a bit more money, but it’s super powerful, cools much faster, and includes a built-in water filter with UV sanitizer. With those features, the 1/2 HP water chiller is the ideal solution and it’s well worth the money if you’re willing/able to spend it.
Use our exclusive promo code “RT200” and get $200 off all chillers from Spartan.
DIY Water Chiller for Ice Bath Instructions
UPDATE: There’s no one way to DIY a water chiller for your Ice Pod, but we’ve put together a video below showing an alternative, perhaps better way of doing things.
Related Reading: DIY Water Chiller for The Ice Barrel
Minor modifications may be required but the overall process and ideas work the same.
And for the record, this tutorial is for informational purposes only. Although it’s very easy to set up, don’t blame us if you somehow damage your ice bath and void the warranty. Very unlikely, but proceed at your own risk.
Total Time Required: ~ 60 Minutes
Total Cost: ~ $600
Required Tools:
– Screwdriver
– Pliers
– Scissors or similar tools to cut hoses
Things Needed?
– Aquarium 1/3HP Water Chiller (most include a submersible pump already)
– 5-10ft Clear Vinyl Hose (1/2 Inner Diameter)
– Inline Filter
– Hose Clamps (1/2 inch)
– Brass or Plastic Hose Barb Adapter (1/2 Inner Diameter, 1/2 Male Inner Pipe)
Steps to construct the DIY water chiller for your Ice Pod:
Step 1: Cold plunge setup and considerations
Follow the manufacturer’s instructions and set up your Cold Plunge, but DO NOT fill it with water yet. We recommend placing it on top of an outdoor plastic rug for added protection and entry/exit slip protection. Keep in mind, that when the cold plunge is filled with water, it can weigh up to 700 lbs. Make sure the underlying surface can support that weight.
Important: Prepare for the worst. Place your ice plunge in a location with good drainage. If it were to ever spring a leak, that’s up to 70 gallons of water that could potentially spew out. Plan accordingly!

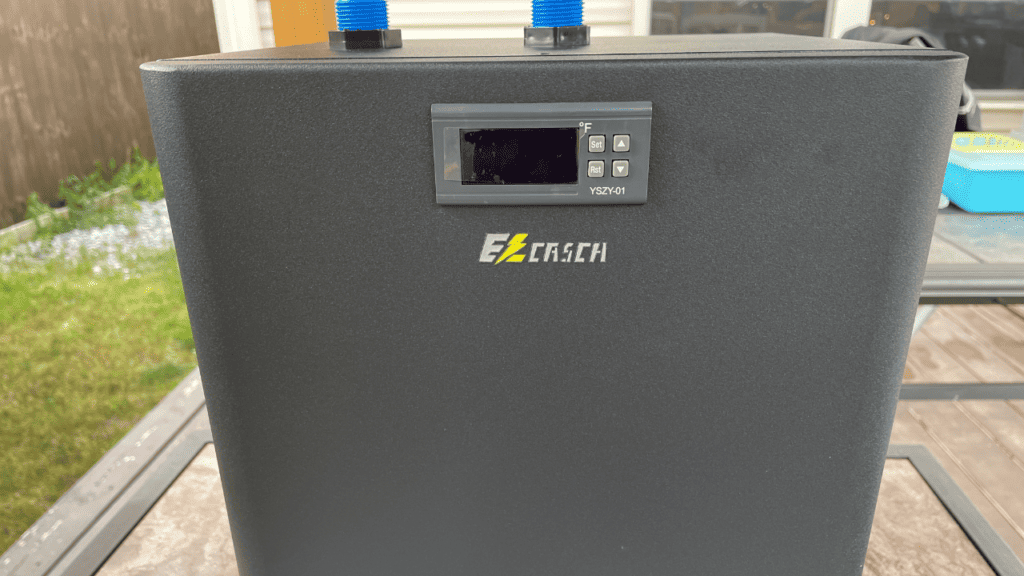
Step 2: Water chiller unboxing and setup
Unbox the water chiller and inspect all of the included accessories.
The chiller requires proper ventilation, so it should be placed at least 1-2 feet from any surrounding objects. Depending on its location, it can be placed on the floor, but we recommend placing it on a small table or other elevated surface. Also, it does need to be plugged in, so consider where the closest GFCI outlet is.
Note: The chiller can be used indoors or outdoors. If used outdoors, place it under a porch covering to avoid direct sunlight or the possibility of getting rained on. In other words, it shouldn’t get wet.
Step 3: Attach the barb adapter
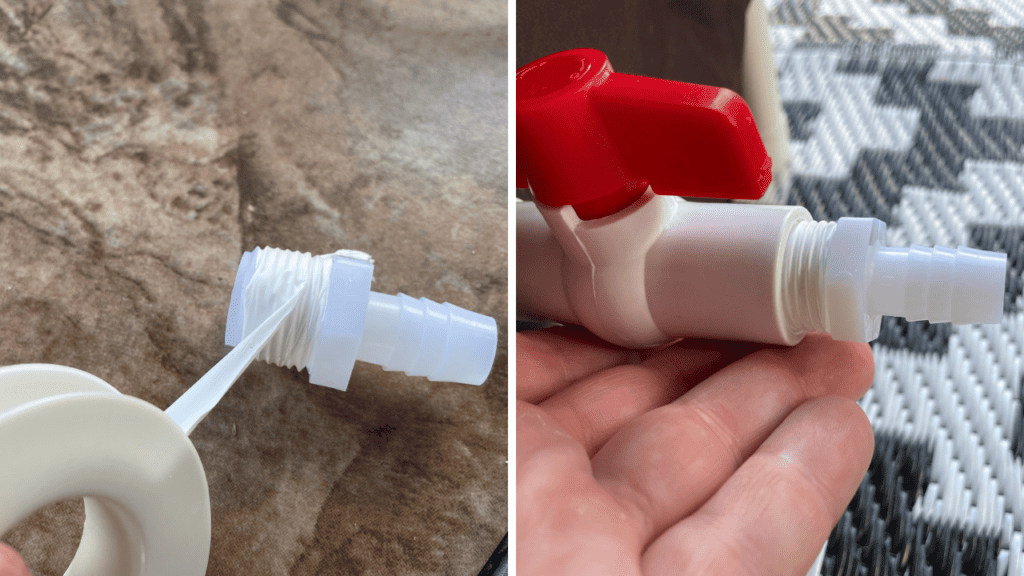
Now that your cold plunge and chiller are in place, wrap the threads of the hose barb adapter with about 2-3 inches of plumber’s tape and then screw it into the threaded water release valve of the Ice Pod. Screw it in as much as you can by hand and then give it about 1 more turn with a pair of pliers so it’s snug
Step 4: Fill The Ice Pod
At this point, make sure the drainage valve is closed and fill the Ice Pod up with water 3/4 of the way to the top.
Step 5: Attach the filter to the water chiller
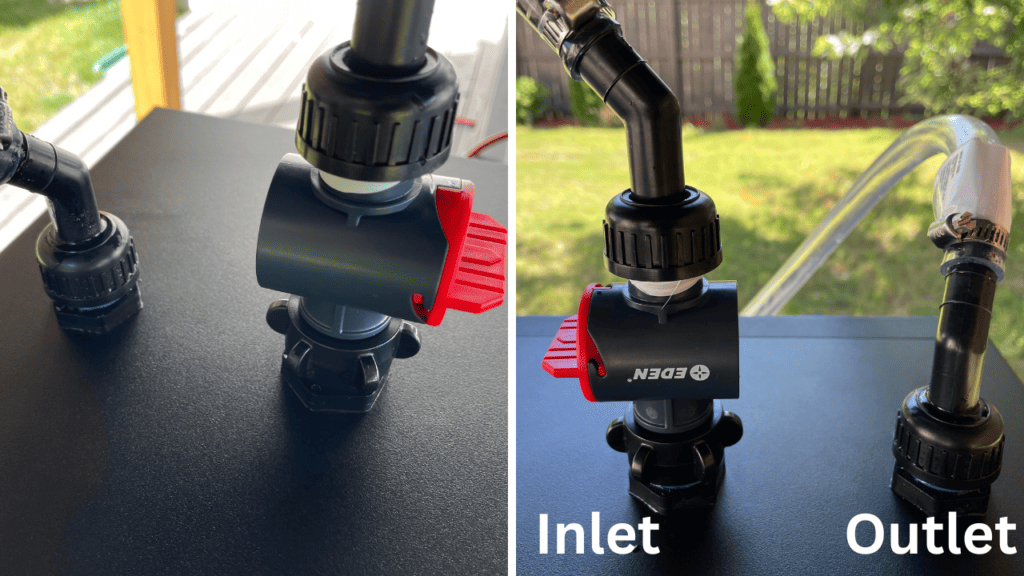
To filter out any sand, leaves, or even bugs, we attached an Eden Inline Water Filter directly to one of the water inlets. Be sure to use plumber tape to wrap the threads. Other inline filter options are available.
There’s no distinction between the inlet and the outlet on the water chiller. Meaning water can flow in either direction without issue.
For our setup, the water that is pumped from the ice bath will travel through the filter before it’s chilled and exits the water chiller.
Afterward, use some plumbers tape again and screw the inlet nozzle into the filter.
Step 6: Attach the hoses

The water chiller already comes with clear vinyl hosing that can be cut in two for the inlet and outlet. However, we wanted to extend the distance between the chiller and the Ice Pod, so we opted to buy an additional 10′ clear vinyl 1/2″ hosing. It’s not necessary, but that’s how we did it.
It’s important to route the hoses correctly.
The hose that attaches to the water chiller’s outlet nozzle will attach to the barb adapter that was installed on the Ice Pod drainage valve.
The other hose will attach to the inlet nozzle and the other end to the included submersible water pump.
For all hose attachments, use a hose clamp to snuggly cinch down on the hose to prevent leaks.
Step 6(A) Alternate Preferred External Pump Method
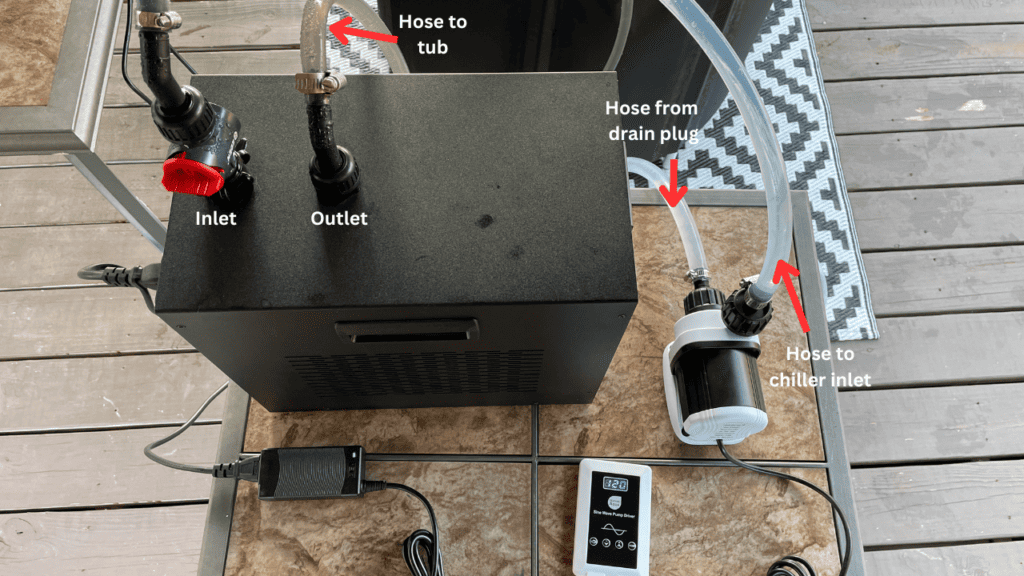
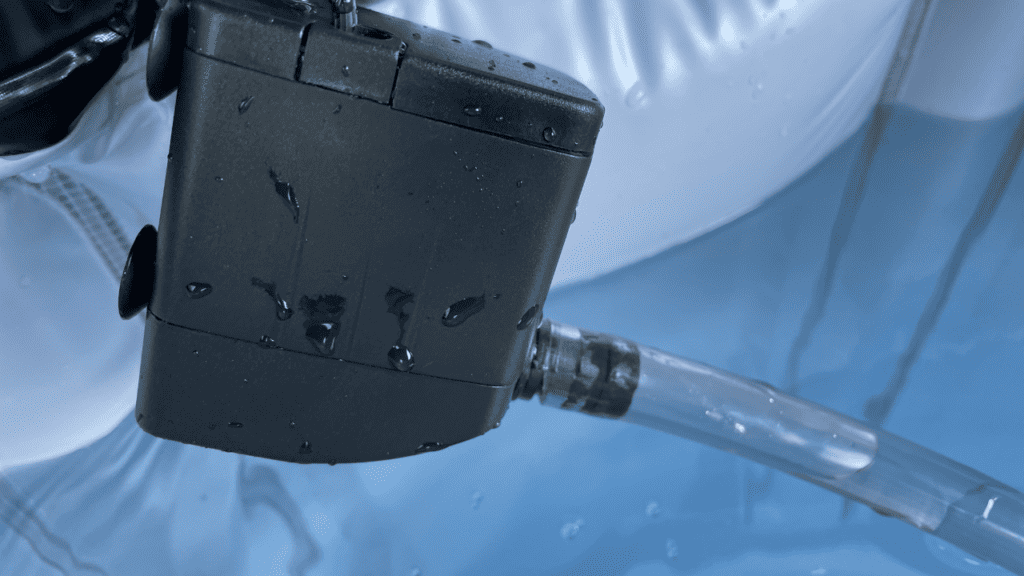
The submersible pump that comes with the water chiller works pretty well. However, if you would rather not plunge with the pump in the water and circulate the water much faster, use this method instead.
By using an external pump, the flow of water will be the opposite of what we just outlined previously. Instead of the cold water flowing INTO the drain hole, the pump will draw it OUT of the drain hole, cycle through the chiller and the return hose will empty into the top of the ice bath.
The Orlushy DC-4000 pump we found on Amazon works very well for this method. First of all, it’s capable of pumping 1050 GPH. The more water you can circulate, the faster the water will chill. Also, it comes with several different barb sizes for installation. Best of all, it’s waterproof, so no need to worry about splashing water. And did we mention it’s whisper quiet?
The inline filter installs the same way as before.
Proper routing: drain plug==>external pump==>filter==>chiller inlet==>chiller outlet hose==>Ice bath
Step 7: Test for leaks
After you attach all the hoses, make sure they’re routed correctly and tightened down properly, then you can test the system for leaks.
Open the Ice Pod drain valve, drop the included submersible pump to the bottom of the ice bath (if you choose not to use an external pump), and then plug the pump in to start the flow of water. Let the water circulate for a minute or two. Check all of the nozzles and hoses for any slow leaks.
Absolutely no water should be leaking out at this point. If there are signs of leakage, try tightening the connections again.
Note: The submersible pump is waterproof and should remain in the water while chilling. Although it’s technically safe for you to plunge while it’s still plugged in and submersed, for safety, we would recommend removing it while you’re in the water. Just to be cautious.
Step 8: Start the water chiller
When you’re sure no leaks exist, you can then turn the water chiller on! Follow the instructions included with the chiller to set the timing and temperature of the water.
Our initial water temperature was 76 degrees with an ambient outdoor temperature of about 80 degrees. After 36 hours of the water chiller running constantly, we managed to see a water temperature reading of 38 degrees early the next morning.
As the day progressed, that temperature rose to 41 degrees and held constant for the rest of the day.
Step 9: Add Sanitizer

To keep the water sparkly clean for as long as possible, add some 3-6% food-grade Hydrogen Peroxide and Sirona Sanitizer.
Start with 1/4 cup of Peroxide and about 1/2 ounce of Sirona added to fresh water.
After each plunge, you can add an ounce of Peroxide. For the Sirona, follow the instructions on the bottle to determine if you need to add more.
The End Result
Overall, the entire do-it-yourself Ice Pod cold plunge water chiller process is very simple and straightforward. Our unit has been plugging along for a few days now and it works flawlessly! In fact, the water at one point got too cold for us warm-blooded folks.
This no-ice, budget-friendly cold plunge water chiller solution is going to save you a ton of cash. Including the Ice Pod, you’re all in price with the added water chiller will run you about $600. For many, we think it will only serve as a jumping-off point to all the possible customizations and add-ons.
We’ll leave those ideas up to you, but for now, enjoy the plunge.
Questions?? Be sure to comment below!
Related: Want to try contrast therapy? Check out a SaunaBox
Portable Cold Plunge Promo Codes and Discounts
Although they’re already really affordable, use the promo codes below for an added discount on some of the top-rated portable cold plunges.
Ice Pod discount code: Get $10 Off. Automatically applied in your cart.
Nurecover discount code: Get 20% off with promo code “Recovatech”
PolarPod discount code: Get 10% off with promo code “Recovatech”
LifePro Allevachill discount code: Get 10% off with promo code “RECOVA10”
Pros and Cons of Water Chillers for Cold Plunge
Pros:
- Better Temperature Control: A DIY water chiller for cold plunge keeps the water at just the right temperature for a more effective experience.
- Convenient and Easy: No need to keep adding ice! A water chiller saves you the trouble of constantly refreshing the ice, making it hassle-free.
- Environmentally Friendly: Using a water chiller reduces water waste compared to melting ice, making it a slightly greener choice.
- Accessible Options: Affordable alternatives and DIY methods such as the one outlined above, allow you to enjoy the benefits without spending too much.
Cons:
- Costly: Traditional water chillers for ice baths can be expensive, which might not be suitable for everyone’s budget.
- Initial Investment: Setting up a water chiller requires some money upfront, which could be a barrier for those looking for a more affordable option.
- Ongoing Expenses: Operating a water chiller consumes electricity, so there will be additional costs over time. But so does buying a bag of ice.
- DIY Challenges: Creating your own water chiller may be difficult if you don’t have much experience with DIY projects. However, this project we would rate a 3/10 difficulty.
FAQ
Commonly asked questions about ice baths and water chillers
The authors and editors that comprise the Recovatech Team have 20+ years of combined experience and knowledge covering the topics of strength, fitness, and recovery. We are impassioned in our pursuit of presenting the most up-to-date information on strength training, cardio fitness, physical rehab, functional movement, nutrition, workout recovery, and best-in-class reviews. Should you feel inclined, please reach out to us at admin[at]recovatech.com.
Bought all the same parts and followed same steps exactly but continue to get leaks. Any help would be greatly appreciated.
Mike! Thanks for the question. Specifically, where is it leaking? One thing we noticed was that without insulating the hoses and with the outside temps being as high as they have been, a lot of condensation can build up, which mimics a leak.
Hi there,
I’m pretty seriously considering this but quick question with context. I have an Ice Pod already. I followed the link for the Labfeng one as it’s the one still available for 1/3HP that you suggest. The description says that it will get the water between 68°-78° for 79 gallons of water. Which in my mind in not cold enough for a cold plunge. What I don’t want is to get it in here and only have my cold plunge at 68° at it’s best because that will be a waste of $400 in my mind. With obvious variables like outdoor temperature etc. not being factored in is it accurate to say that these chillers go to a lower temperature than the manufacturer’s description states?
I know it’s a bit long winded but hopefully all that makes sense!
Thanks so much!
I agree, that would be a waste! But no worries, not sure why they specify that (likely because you probably wouldn’t go much lower with an aquarium I’m guessing) but you can select a temperature down into the 30’s. We have gotten our water temp all the way down to 38 degrees. Granted, that was in the morning and temps the day before were around 80+ degrees. Also, the plunge was under a covered porch with no direct sunlight hitting it. During the day, the temps rose just a little bit into the low 40’s.
Great tutorial. Could I humbly recommend adding a layout drawing of the parts and where/what they connect. The photo’s are great but a layout drawing would be awesome for people like me with lots of confidence but zero prior knowledge. Thank you.
Jay, that’s a great suggestion. We’ll have to look into that. In the meantime, reach out if you have any specific questions on the build.
What inline Filter do you recommend?
Rachelle, the Eden inline filter works really well for sediment and larger particulates. If you’re looking for more filtration, take a look at our DIY for Ice Barrel. It has a lot of the same information and it can absolutely carry over to any portable ice bath. https://recovatech.com/diy-water-chiller-for-ice-barrel-300/
Hey there, I bought the recommended chiller and it worked for a very brief period of time. I had it running overnight and it was working fine, but earlier today I turned it off and then turned it back on and the screen still works but the fan won’t kick on anymore. The light is just blinking very fast saying “working” but when the device was working it was a solid light rather than blinking. There isn’t much info about this online but I wanted to see if maybe you knew why it could be doing this. The fan/chiller isn’t running at all, but the screen still works fine and I can still adjust all the different settings but it never kicks on. The Fuse is fine.
Interesting, haven’t seen it do that before. I know if it gets overheated, the compressor won’t come on until the temps drop a little bit, but that’s a new one. Have you tried reaching out to the seller?
hey there, I tried using the recommended Orlushy pump and it did not include a barb attachment for a 1/2 inch hose, the smallest size was .65 inches. How did you fit the 1/2 inch hose?
Walter, it’s snug, but it will go on with a little effort. Or do it the easy way and heat up some hot water, place the tip of the hose in the water for a few seconds and then try again. It should slide right on. Hope that helps!
gotcha, thanks for the tip and and for the whole tutorial, much appreciated!
Of course, glad to help. If you’re looking for some more ideas on putting together the chiller, take a look at this build for the Ice Barrel. 90% of it can be applied to any cold plunge. https://recovatech.com/diy-water-chiller-for-ice-barrel-300/
First off, a big thanks for the excellent tutorial! I followed all your instructions, including the optional Orlushy pump. The lowest I have been able to get the temp has been the mid-50s, with it normally hovering around 60. It’s indoors in a 75 degree apt, so I don’t imagine that is the issue. I’m wondering if you have any tips for improving the efficiency? So far the following have come to mind (in increasing order of difficulty)
-Shorten the length of all connections to minimize exposure to air
-Add an external fan behind the chiller to disperse the hot air
-Somehow add insulation to the Nurecover
With the pump is it normal for it to force just a trickle of water through? You state it can pump 1050 gph, I doubt I’m seeing anywhere close to that, so I’m wondering is if my flow rate is too slow. Are there any settings on the pump to improve this? I have it on the 120 mode like you have pictured.
Also – to the above comment about the connection to the Orlushy pump – I used a hairdryer to heat up the tubing and was able to work it on. I also used silicon tape on all fittings to eliminate leaks.
Will, lots of questions and hopefully, I have some answers, lol!
First of all, great tip using the hair dryer. Easier than boiling water.
Second, all the ambient temperatures seem like they’re in check, so that’s interesting you’re not able to get a colder temperature. Those portable cold plunges don’t have the best insulation, but even I was able to achieve a high 30’s/ low 40’s temp using one. I’m thinking it has more to do with the water flow based on what you mentioned about the trickle of water. You should have a strong steady flow, similar to a hose hooked up to an outdoor faucet.I’m guessing there’s a bottleneck somewhere or a kink, maybe? If the water’s not flowing well, it’s going to be super hard to cool all the water. If you like, send a picture of your setup to admin@recovatech.com and perhaps I can spy the issue.
Third, all of the solutions you mentioned are good ideas. From insulating the hoses to wrapping the outside of the ice bath, any way you can eliminate heat exchange is recommended. As for the fan, I actually bought a 140mm computer fan with a plug and have it blowing directly into the side vent to introduce cooler air.
Bottom line, I think I’d troubleshoot the pump/water flow issue first. Let me know how else I can help.
Thanks so much for the quick response! I ended up taking everything apart and going back to the sub-pump that came w/ my chiller…still no improvement. I was just about to tear into the chiller and see what was slowing things down when I decided to check the filter – completely blocked. Crazy for a week of operation. I cleaned it under a hose and now everything is flowing freely and cooling down again. I’ll probably try putting the Orlushy pump on there again later this weekend.
Wow, well at least the filter is doing its job! Glad it was an easy fix!
I put this together over the weekend and it is fantastic – thank you! Two questions: 1.) we live in Florida, so we have really bad condensation on our unit. Any suggestions for how to avoid this on the tubes? Water drips on the chiller, which I’m worried about, so for now we just put a microfiber cloth to catch the droplets. 2.) we purchase the ebay chiller you suggested, any insight on longevity? our water temps without the chiller are near 90 so the plan is to continuously run the chiller for daily use (5-7 days a week). Thanks!
Julianne, awesome! As for the condensation, get some foam insulation tubing from Home Depot to wrap around the hoses. Not only should it stop the dripping, but keep the water colder. Second, as far as longevity, that’s TBD unfortunately. Our unit has been doing really well for the past few months without issues. I think as long as you keep it out of the elements, make sure it’s ventilated well, it should hold up. eBay does offer Allstate warranty plans on some items. If it hasn’t been too long, you might still be able to purchase one post-sale.
Have the ice pod pro with two valves and running a submersible pump (Active acqua)with a 1/2 hp active acqua chiller, I got everything running except that, due to the internal submersible pump, the return hose is inside the water instead of exiting through the valve. I am using a 1” to 5/8 in hose.
My question: is there an adapter to insert the inside of the valve female to male) as to push the water outside to the valve (and then another adapter male to female) to connect another hose to the inlet valve of the chiller and have no hoses coming thru the top?
What is the diameter of the inside hole of the pod pro valve?
If I understand you correctly, it sounds like you just need to attach two barbs to the 1/2″ ID valves. See the tutorial section about adding the barb. If you do that, you should be able to attach a hose to the valve and the other end goes into the pump. From the pump, run another hose to the chiller and then the return hose goes to the upper valve with the barb. Hope that’s clear.
In Step Step 6(A) Alternate Preferred External Pump Method , you are connecting hose from drain plug to pump (in) the tubing is 1/2″ —->Pump (What is fitting at pump in end)
Hi Sam! If I’m understanding you correctly, the hose from the drain valve connect straight to the pump. The pumps come with the barb attachment you need to connect it so no need to buy anything extra. Hope that helps.
Hi! Thank you so much for putting this tutorial together. I’ve been plunging for a couple months now and love it but warmer weather is ahead. My main question is probably a dumb one, but how do you drain it when the time comes? My setup is in the garage so I currently have a 20 ft washing machine hose that I clamp into the built in drain valve. If running water through there for the pump though, how do you drain? Unscrew, drain, reassemble? Or is there an option to go through the pump? Thanks so much again, looking forward to trying this out
Hey John, You could definitely detach the hose at the drain and then attach your washer hose. Alternatively you could detach the hose from the outlet side of the chiller and attach your hose directly to that side while still running the pump to drain.
Great tutorial, thank you.
Just wandering, when using an external pump, would it be better to have the filter placed before the pump instead of after it? My thinking is the filter would then stop any bits going through the pump which may cause issues in the long term?
Vince, I’ve actually done it both ways and here’s my thought. If you’re tracking in a bunch of debris like grass and whatnot, having a filter BEFORE the pump is probably a good idea. I’ve been working on a number of DIY projects. Take a look at this video. It doesn’t apply 100% to an Ice Pod and you wouldn’t even need to put the chiller in a box, but the pump, filter, and chiller setup might give you some ideas. https://youtu.be/x605-IoJSFI
Tried to comment earlier, not sure if it went through, but we just purchased this set up to do the exterior pump setup! We currently have a small aquarium filter to help with filtration. Should I hook the pump up before this filter and just not plug the filter itself in and let the standalone pump to all the work?
Penn-Plax Cascade All-in-One… https://www.amazon.com/dp/B0002DJ9NY?ref=ppx_pop_mob_ap_share
Hey Chris, I think we were talking over on Reddit a few days back. For that filter, you say it has a built in pump, right? If so and as long as it has good flow to it, I would just use that all-in-one setup you have. If you get a chiller, all you need to do is have the water run through the filter first with the exit water going into one side of the chiller and then run the other hose back into the top valve of the Ice Pod. Hope that’s clear.
Thanks for the fast response!! And Yes that’s clear, but I understand the higher the GPH the better the cooling will be? And I read that as the chiller wont have to work as hard. Our filter only runs at 265gph. Would that be anywhere near enough?
Sometimes those GPH numbers can be skewed. I would say that if the flow of water is coming out strong and with a little bit of force, you’re good. If not, a bigger pump would be recommended. I’m currently working on a video as we speak about this very topic. I’ll let you know when it goes live to perhaps help you out.
Yes, please keep me updated on that video! I think I’m going to keep the filter unplugged and use the external pump you recommended to push everything through the system. I already ordered it and I figure the less stress on the chiller, the better!
Appreciate the tutorial! I finished building this with the external pump using all of the recommended parts. My one issue is with the Eden filter. In the first week, I’ve had to wash the filter twice per day in order to restore the water flow. The water flow is great once the filter’s clean. Do you have a recommendation for a better filter that I can buy that won’t need to be cleaned as often?
I do! Take a look at this video which I just put out. I’ve since updated the filter. You could follow that video exactly or try this alternative method with a larger pump. Either way works great and will save you the headaches of emptying the filter all the time.
Works great! First run this morning, no leaks and got the water temp down to 36. I saw you like you unplug the pump before getting in, but do you keep the chiller running 24/7 otherwise?
I only unplug the secondary pump if it’s sitting in the water. I only use it to help circulate the water. Lately, I’ve been turning off the chiller and only turning it on a couple hours before I need it. I plunge often so the water doesn’t ever sit stagnant for too long.
Hello and thank you for such a thorough DIY guide! Planning on going with this guide but since it’s been a year, I want to know if you’ve made any upgrades and/or changes to set your set up that you would like to add to the buying list (saw the filter upgrade in the comments). Thank in you advanced!
Hi, that way certainly works, but I think this newer method works a bit better: https://youtu.be/99_YJotgl2s?si=ucgLisAMiOKuzz4f